This guide will lead you step-by-step through every configuration step necessary to set up SIP communication.
¶ 1. Register SIP Account
First, you must register at least one valid SIP account on the system.
¶ Navigate to SIP Accounts
- Go to the Settings menu.
- Go to the SIP Accounts sub-menu.
¶ Enter SIP account credentials
- The provider of your SIP account should provide you with the following information. Enter these into the corresponding fields.
- "User"/"User name" (SIP username)
- "Password" (SIP password)
- "Domain"/"Registrar"/"Registrator" (SIP registrar)
- Give the SIP account a recognizable name under Display name.
- Enter the corresponding SIP account information in the fields below Display name.
- Click on Save.
- Your SIP account is created. If registration was successful, you see registerOK in the list to the ⇐ left side.
For more details on configuring SIP accounts, see this article.
| ? | But I don't have a SIP account yet! |
| If you do not have a SIP account yet, why not get one from Ferncast directly? Contact us under info@ferncast.com and ask us to make you an offer for a yearly SIP account subscription. |
¶ 2. Create Call Profile
| ? | What are Call Profiles? |
|
Call Profiles are pre-configured encoder settings. These are used to define audio encoding, processing and call behavior for SIP calls and some RTP connections. Importantly, they define the priority order for which codecs to use for a SIP call in cases where it might be unsure what codecs the remote system supports.The higher the codec is placed in the priority list, the higher priority it has. When a SIP call is made, aixtream will work down the list to find a codec which the remote systems supports and accepts. |
This step is optional. For your first SIP call with aixtream, we recommend using the preconfigured Default Call Profile. This Call Profile is configured to be maximally codec-tolerant, to ensure a SIP call is successfully established.
¶ Navigate to Call Profiles
- Go to the Settings menu.
- Go to the Call Profiles sub-menu.
- The most important options when configuring a custom Call Profile is setting the priority order under Encoder. Drop a codec into the field marked Drop a codec here to add it to the profile to start configuring your Call Profile.
- You may also want to toggle Auto-call on register On. This means aixtream tries to reestablish any calls that were active when the internet connection or registration was lost.
For more details on other Call Profile options, see this article.
¶ 3. Create Pipe Templates
You must configure a Pipe Template to define the audio flow (input/output channels, AES67 sessions, etc.) for your SIP calls.
¶ Navigate to Pipe Templates
- Go to the PIPEs menu.
- Go to the Pipe Templates tab.
¶ Configure Pipe Templates
- Click on Template.
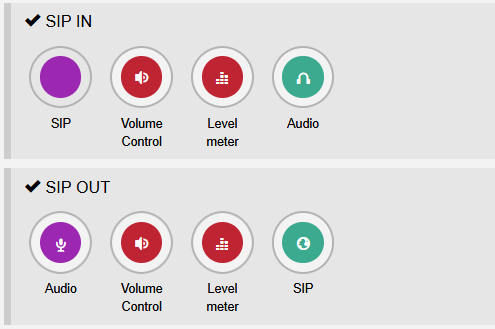
- Configure a PIPE for the SIP input and save it. Give the Pipe template a recognizable name.
- Configure a PIPE for the SIP output and save it. Give the Pipe template a recognizable name.
See below image for a simple example of a SIP input and a SIP output PIPE for regular audio in/out. You can replace the Audio source/sink elements with Audio over IP source/sink elements to use AES67 for the input/output. Do not forget to configure the audio channels or AES67 session by clicking on the responding PIPE elements.
¶ 4. Enter a Phonebook entry
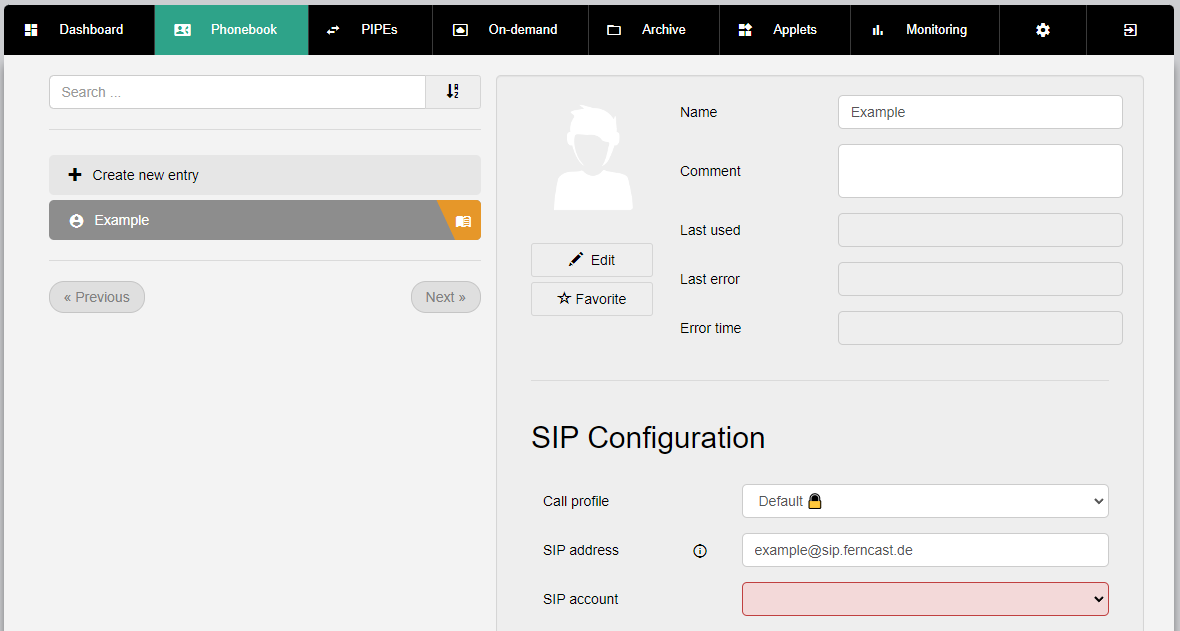
¶ Configure a Phonebook contact
- Go to the Phonebook menu.
- Choose the Call profile to use with the contact (we recommend going with Default for your first try).
- Enter the SIP address of the contact.
- Select the SIP account you configured earlier in the dropdown.
- Scroll down to Sending Pipe and Receiving Pipe.
- Select the Sending Pipe you configured earlier in the dropdown.
- Select the Receiving Pipe you configured earlier in the dropdown.
- Click +Create.
- The Phonebook entry is configured and created. You can now start a call with this contact by clicking on the phone receiver button in the list to the ⇐ left side, next to the entry for the contact you just created.
See this article for more details on the Phonebook menu.
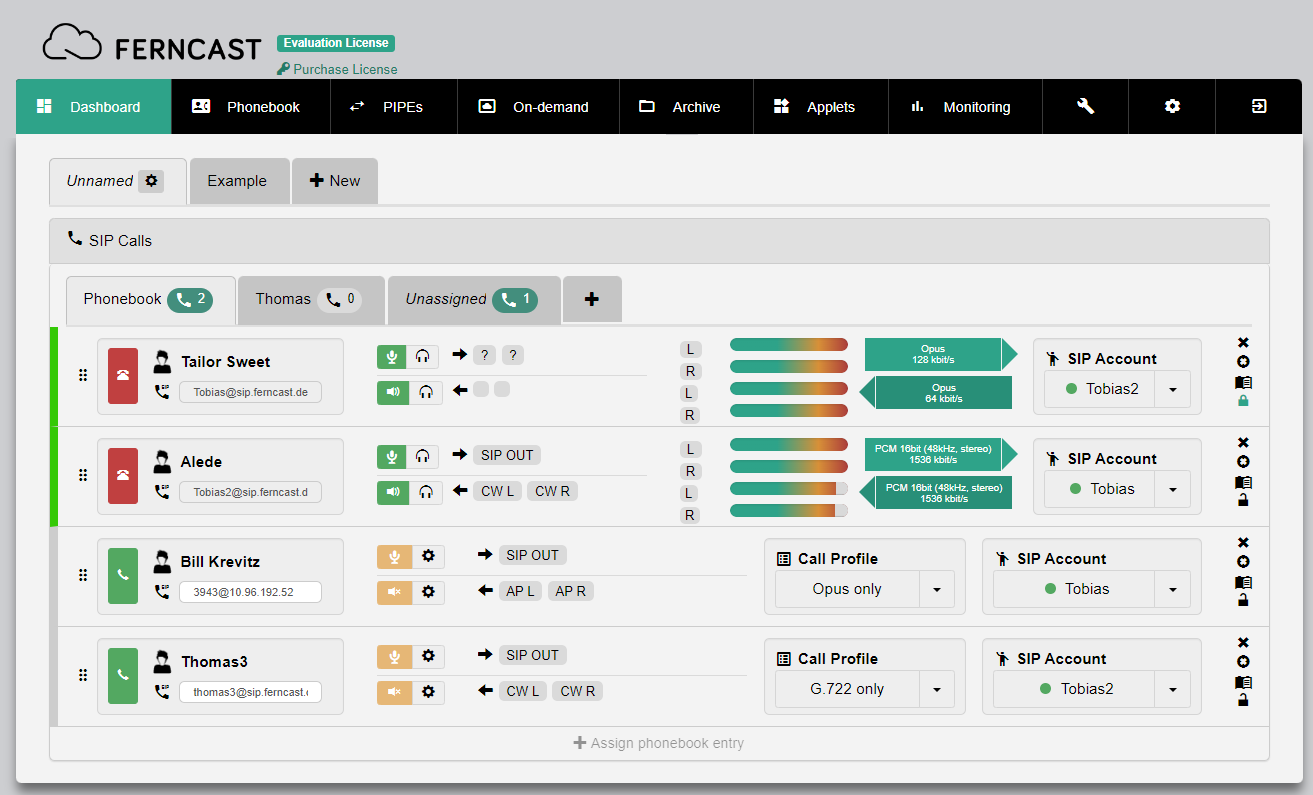
¶ 5. Set up SIP Calls widget
We recommend setting up a Dashboard for your SIP communication including the SIP Calls widget.
- Go to the Dashboard menu.
- Click on +New to open the Customize Dashboard menu.
- Drag-and-drop the SIP Calls widget into the Dashboard (top).
- Click +Create.
- Click the large + button to create a new tab in the SIP Calls widget.
- Enter a name for the tab in the Presetname field.
- Click on + to create the tab.
- Click + Add to add your first Phonebook entry to the list.
- If desired, add more Phonebook entries by clicking + Assign phonebook entry (bottom of the widget).
- Your SIP Calls widget is set up and ready for use.
See this article for more details on the SIP Calls widget.